Saturday, November 30, 2013

I LOVE MAKING THINGS....

I LOVE MAKING THINGS!
 
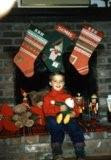
The glue gun is killing me, but I love adding the baubles and sparkles to these little trees.  I don't know why I never did it before...but they are fun!  (You've seen my earlier post ...my ladies' night with Sis Boom...that got me going on the sparkle aspect....!)  I remember as a young girl gluing sequins to felt tree skirts....
Making things is so much more fun than shopping for gifts...I'm so sick of the ads for shopping for the "early bird deals"...kills the Christmas spirit. It doesn't take long to decorate these trees and it makes you stop and think about family and Christmas memories.  Now, unfortunately, the craft stores are already having their 70% off sales...it's not even December 1st....so good luck finding them....back to the internet. 
 
See the star hanging over my desk?  It's made of flocked red paper....I love it....it's not just going to be for Christmas.  I've been doing some painting but nothing I can show or it will give away some Christmas ideas I have in the works....I'm having fun!  Hope you are too.

Saturday, November 23, 2013

Inspiration from Sis Boom!


Art Journal
Mixed Media
Inspired by Sis Boom
On a magical evening 
Above is how my creative space looked today....I had so much on my desktop that I barely had room to work!  This always happens...I'm a messy artist.

 I went to a Ladies Night earlier this week....a night of creativity and shopping....The evening was hosted by fabric designer+, Jennifer Paganelli...aka, Sis Boom.  The pieces of paper are all Jennifer's designs. 
 (I also did a little Christmas shopping!)

 
We made the paper circles garland during the evening.  I ended up draping it as you see on my inspiration board and I love it. A close up below.

Here is my two-page journal spread:
 
  I used acrylics for the background... different shades blues, pinks, etc.  I took part of a polka dot napkin and glued it to the lower half of the right hand page. Across the top and down the sides of the pages are triangles cut from Sis Boom paper.  The colors are to die for!  Her evite had a Christmas tree which I printed and added to the left page along with Sis Boom Show.  On the right, I added a window that  I drew on a separate piece of paper, and painted a Christmas tree in the window.  When we approached Jennifer's home on this festive evening....there was a Christmas tree in one of her windows....so welcoming.  I took more of the paper scraps and created a Christmas tree on the right hand page as well as a Christmas gift, bottom right.  And I've added words to the pages....below are larger shots because the pages absolutely sparkle!
Above, the page has tiny sequin stars and sequin helixes and dots of glitter glue....it looks amazing.  The words ..."Creativity was in the air" and "Welcome."
 Below you can see better how the tree was formed.  My heart says "Thank you Jennifer PaganelliAnd top left it says, "A magical night". The Christmas box was created from her evite and I used glitter glue to outline it.


From this angle, you can see some of the shiny glitter glue drops.


Jennifer's evening was full of sparkle...you couldn't help but feel the joy of the holiday season in every corner of her home.  She truly inspired me!

Sunday, November 17, 2013

i imagine....

Art Journal

These pages started with a little bit of molding paste and a stencil on the left page. I painted an undercoat first on both pages.


 Then I did a coat of Midnight blue paint mixed with some glazing liquid over the entire page and let it set for about a minute.  Then I wiped the paint off.
I like the effect.  Then I added some turquoise blue here and there on the swirls and ultimately some gold. I sewed a button onto a piece of paper that I cut into a scalloped edged circle.  The detail of the button, which you can't see is that it looks like the background of the page.  There is also a striped button on the page.  The butterfly is decoupaged onto a piece of card stock.  I only have it glued down the center of the butterfly so it appears ready to take off....and I added two words...i  imagine.
The opposite page:
This page I also had painted the background.  And then I drew a wire birdhouse that I have...I like things made out of wire.  At any rate, it didn't have the whimsical quality that I was hoping for and it was really difficult to draw.  I think if I had used a pen with a smaller point it might have worked.  However, as you can see, the bird cage is nowhere to be seen.  I painted over the whole thing.  In it's place, you see a napkin that I decoupaged to the page.  I covered it with gloss decoupage to make sure the napkin was protected.  There is a small brass bird sitting on top of the Eiffel Tower.  And right in the middle of the compass is the word....fly.  I also added a nice piece of ribbon on the right side of the page.  Below is a close-up of the button/butterfly.  That's my weekend art! 

Tuesday, November 5, 2013

Paint & Wine Class....A Starry Starry Night

Another fun Paint & Wine class on Saturday night!  We were all searching for the "van Gogh" inside us.  Who doesn't love this famous painting....(not mine...his)!!!   While I feel mine is more "folk arty"....his is wonderful Impressionism.  And what makes his paintings so wonderful, besides the "energy" in them and his great use of color...is that he puts a lot of paint on the canvas.  In the class, I'm trying to capture the subject. Learning his actual technique is a whole different thing.  I have to say that everyone had a super painting and all unique in their own way. What would van Gogh think if he knew what an "impression" his art still makes today? 

Sunday, November 3, 2013

Altered Book Class Resumed

Altered Book
We resumed our altered book class on Saturday...our instructor wasn't able to teach it this past year, but we had our reunion this week.  So much going on on these pages....there was too much to do at the class, so I brought home lots of the pieces....and I changed the right page quite a bit.  For the class, the instructor had us work on an accordion book with tag pockets.  When I got home, I didn't like what I had put on the book pockets so I opted not to put the book in.  Instead, I created a large pocket down the right hand side and made pockets for the tags there...
 Here are the tags...they have designs on the reverse side as well.

 You can see on the right hand side, where the tags go into the pockets.

 These pages have lots of collage elements, metal attachments, the tags, the paper rosette, the pages on the right side are cut in increments and the edges cut in curves and zig zags. 
Saturday night I went to my monthly Wine & Paint class...haven't photographed that yet.  A day filled with art and creativity.